Brew Day:
1. Take yeast and hops out of
fridge so they can warm up to room temps.
2. Put 1.5-2.0 gallons of water in your kettle and set burner on high. (I always start with cold water because my hot water itself doesn’t taste as good as my cold). Remove aerator from faucet if you prefer.
Remember, you will be adding malt extract so don’t fill your kettle up too much at this point. A 4-gallon brew pot is probably as small as you would want.
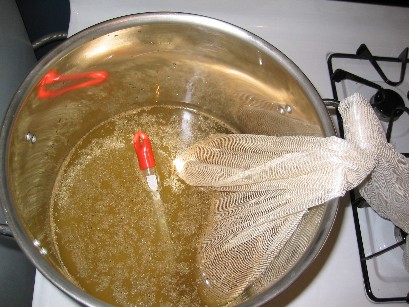
You can see how I tie the bag onto the handle of the kettle to keep the bag from hitting the bottom of the kettle. This is probably not necessary but it's how I do it.
3. Put your crushed
specialty grains in your muslin bag and put them in the water. If your grains
are not crushed, I’ve been told a rolling pin or even beer bottle will do the
trick. Don’t pulverize them, just crack. Tie the bag to the handle of the pot
so that the bag is not quite resting on the bottom of the kettle. When the
water is cool, just reach down in there and check.
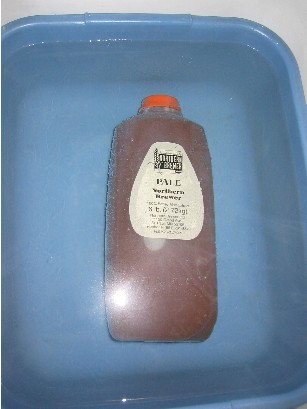
4. Put your liquid malt extract
container(s) in a tub of hot water in the sink to soften it. This will make it
easier to pour.
5. Put your floating thermometer
in the brew pot and check the temp. The temp will be higher than the actual
water temp because the bottom of the thermometer is touching the bottom of the
kettle. To get the accurate temp, hold the thermometer in the water but off the
bottom until the temp adjusts.
6. Stir the water every couple minutes to get it flowing through the grains. Gently agitate grains to get ones in the center to the outside so their full flavor and color can be extracted.
7. Steep the grains until the
temperature is around 150-170. I usually take them out around 160 because
someone told me if you get too close to 170 you might start getting some off
flavors out of the grains. By 150 you have gotten any benefit from the grain
that you are going to (color and flavor). When removing the grain bag do
NOT squeeze the grain bag too hard. Just let the juices run out and give it a
gentle squeeze. If you apply too much force and you will get some harsh tannins
out of the grains.
8. Continue heating until boil
begins.

If I wasn't taking a picture with one hand, I'd be stirring the wort with a spoon while dumping in the extract.
9. Turn off heat. Take pot off burner. Get water stirring and then dump in malt extract. ** Note: Dry Malt Extract will clump up the instant it hits steam, so try to go ahead and dump that in all at once, if you have any. Many kits don’t use any DME.
To get every last bit of Liquid Malt Extract out of the container, heat up some cold water in the microwave. Add it to the plastic jug. Put the cap on and tip it back and forth until any remaining extract is dissolved. Add to kettle.

Dumping in the whole bag of DME all at once, as much as possible.
10. After all the malt extract
is in, put back on hot burner and turn heat back on.

This is about as full as I like to get my kettle, to reduce the risk of boilovers. I think it's a 4 gallon kettle. I probably have a little over 3 gallons in it in the picture and usually end up with just over 2 after the boil is done.
11. You need to bring it up to a boil again before you add hops. Hops need to be boiled for 60 minutes. Your ingredient kit will have specific instructions about which hops you add for how long.

My way of reducing the risk of boilovers. I scoop out some wort in a bowl and add the hops to that first.
12. The addition of hops is the greatest cause of boilovers. Hops make the pot foam up, sometimes 3-4 inches higher than the current wort level. So watch out when you add them. One thing I do if I fear my level is high enough so that a boilover might occur is to scoop out a little boiling wort, dump it in a bowl, and then add the hops to that. After they have acclimated, then dump that back into the pot. You can also just add them a little at a time, letting the wort acclimate to the new hops before adding the next bit. These tips should help decrease the chance of boilovers.
Click HERE
for a short video clip (660k) of what I consider an adequate rolling boil.
13. Once you add the hops, you will need to follow the instructions with your kit for the rest of the hop additions. Set the timer for the amount of time until the next addition. If you don’t add anything until the aroma hops, you would set the timer for 58 minutes to be able to add aroma hops with 2 minutes left in boil.
14. Stir the pot periodically. Keep it boiling pretty well but it doesn’t need to be going nuts. Do NOT cover it with a lid.
15. Add the aroma hops with 2
minutes left in boil. When boiling is done, take off burner and put lid on.
The steam will kill any potential nasties on the lid.

16. Fill up a sink with a little
water, then put brew pot in it. Continue adding cold tap water. Add 4 trays
worth of ice. This will melt relatively quickly for this first time. Stir
water and ice around until it is melted and water is not too cold anymore.
Should be 5 minutes or so. Kettle will still be pretty hot to the touch.
17. Take kettle out (keep lid on
this whole time), drain water in sink, add new water, and add 4 more
trays of ice. Do same thing. This time it might be in there 10 minutes or so.
18. Do this one last time and dump in the last 4 trays of ice. After this total process has been 20 minutes or so, the pot should be fairly cool to the touch. It might not be cold, though, and that’s fine. Remember, you will be adding the 2 gallons of wort to about 3 gallons of refrigerator-cooled water.
19. While the brew pot is
cooling, sanitize your fermenter. I don’t know how other people do it, but to
sanitize a 6 gallon fermenter I put 3 gallons of sanitizer in it. If it is a
bucket, I use a sponge and wipe around the inside of the bucket continuously for
at least 2 minutes. The goal is to get ALL surfaces that will touch the beer to
be in contact with sanitizer for 2 minutes. I have not had any problems
sanitizing it this way. Don’t forget to get the inside of the plastic lid
because the top of the beer’s krausen might get up that high and touch it.
20. Then I run the sanitizer out of the spigot into a kitchen tub or sink for 2 minutes. This sanitizes the inside of the spigot, which is helpful for when you will drain the beer out of it 5-7 days from brew day.

I poured two gallons of water
into the fermenter first and then added my wort. As you can see, I ended
up with a little over 2 gallons of wort to bring my total to just over 4
gallons. After this, I topped it off to be about 5.2 gallons.
21. When the sanitizer is out of the bucket, dump 2 gallons of your chilled water into it, splashing it as much as you can. You want to get a lot of oxygen into the water at this point. Then add your wort, splashing it as well. If it is cool, you do not have to worry about oxidizing it. To get even more oxygen in to your wort, you can shake your fermenter carefully but forcefully. You can also sanitize a whisk and try to aerate with that (if using a bucket, that is). The more bubbles you get into the wort and see foaming at the top, the better.
22. I fill my fermenter to be just over the 5 gallon mark, maybe 5.2 or so. This is because in transferring it a couple times you will lose a little bit and it’s nice to end up with 5 gallons at bottling time. Many brewers start with 5.5 gallons.

Here is my O2 system in action. In the middle of the picture you can see the bubbles being dissolved in the wort.
23. Take the hydrometer reading after your wort and water mixture is well mixed and aerated. You can run a little out of the spigot. But, you might want to stir it up first since the wort and water might not have mixed all that evenly. If you get a reading that differs quite a bit from your Target Gravity, then you probably have an incompletely mixed sample.

This is what an activated yeast smack-pack looks like when it is swollen.

I usually make a yeast starter (see bottom of page) but it is not necessary. For this lighter beer, a Sierra Nevada Pale ale clone, I decided just to pitch the activated smack pack.

Here is what it looks like when you pitch a yeast starter. Before I dumped the whole thing, I stopped and swirled up all the yeast on the bottom. Fear not!
24. If temp of the fermometer
is 75 or less, go ahead and pitch the yeast. You can give it a gentle swirl
with the spoon.
25. Seal the lid on tightly.
Place the SANITIZED airlock on top and put a little sanitized water in it.

If you are using a glass carboy, you will use a blow-off tube, seen above.
26. Fermentation should start 24-48 hours. Keep an eye on the temp. It should stay around 70 as best as possible. Lower than 70 is a little better than higher. You can ascertain the yeast's optimal temperature range and shoot for about the middle of it.
http://www.wyeastlab.com/beprlist.htm
27. I leave all my primary fermentations for about 1 week, but I’d say 4-5 days is minimum. When airlock activity has greatly slowed (one bubble/minute, for example), you can transfer to secondary.

If things go well, you are on your way to creating a great glass of homebrew. Above is my Bell's Two Hearted ale clone.