
Simple All-Grain Brewing (video version of this guide)
(The Extract Brewing Guide is here.)
I thought all-grain brewing would be difficult and the equipment too expensive. It doesn't have to be. One person who helped me believe I could do it is Denny Conn.
You will need a few additional pieces of equipment beyond the typical, stove-top, extract brewing setup.
Note: some of these prices are from 2005, so they could be different today.
1. Turkey fryer and pot. ~ $40 (Don't let anyone scare you. Aluminum kettles are fine).
2. Immersion wort chiller. ~ $35 How I made my new one (2010). Here is my friend making his. My old one (2005).
3. Mash tun. ~ $25 How I made mine.
4. Propane tank. ~ $35 (If you have a gas grill, you can use that one. But I like having a separate one for brewing. That way I don't have to switch, and I have a backup in case one runs out).
So if you use your existing propane tank, you can get into all-grain brewing for ~ $100. A batch of all-grain beer costs $15-$20 (or less) to make, instead of $25-$30 for extract, so you'll get that money back after ~10 batches. [those prices have gone up since 2005...]
A simple all-grain brew day:

1. Heat your strike water. Most people probably user their turkey fryer/burner to do this in their brew kettle. I like to save propane and heat the water on my stove.

2. A trick I learned after doing a few batches is to PRE HEAT the mash tun. That is, if your strike temperature (the temperate at which you are going to add your grains) is 162, heat the water to say 175 and dump it in. Your mash tun will absorb some of the heat immediately. Close the lid and let the plastic heat up.

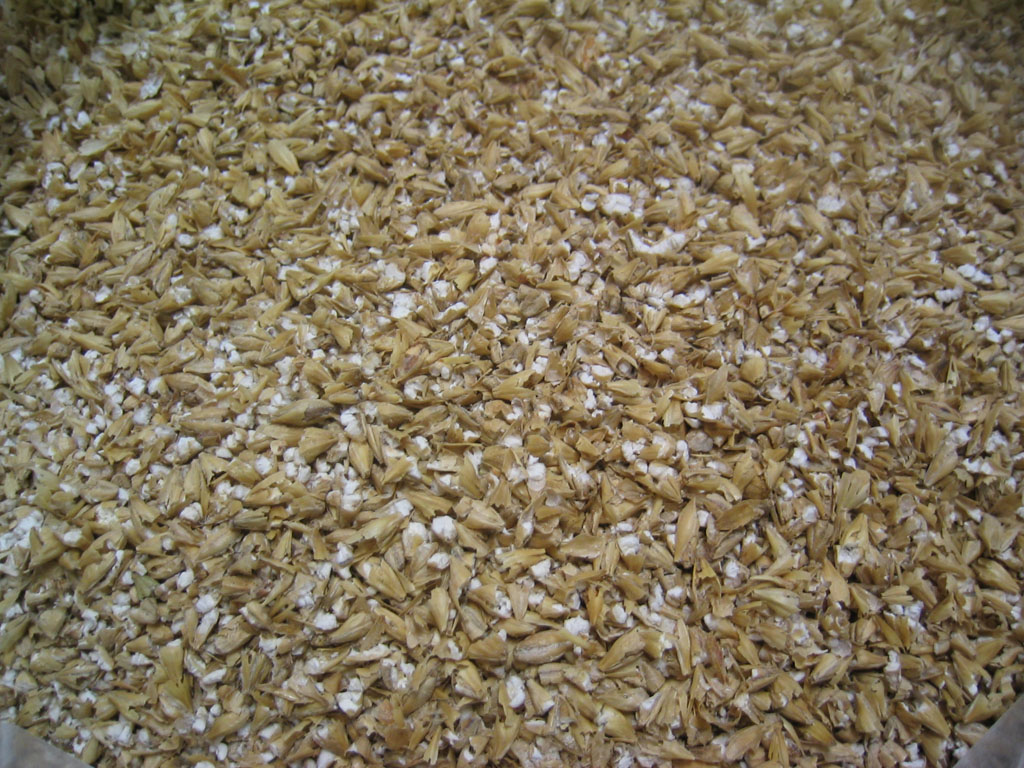
Milled grain waiting to be mashed. For a couple close-ups of properly milled grain click here and here.

3. Once your strike water is the right temp pour in the crushed grain and mix well. Take a temperature reading. If you are too hot, add a few ice cubes and stir. Hopefully you will not be too low because that will require adding boiling water which can be kind of a pain. I sometimes add the grain a degree or two above my strike temp to avoid having to add boiling water. It is pretty easy to add ice cubes.
Here is a nice calculator for finding the temperatures and amounts you'll need.

4. I was aiming for 152 and I hit it. It doesn't matter too much if you are a degree or two off one way or another.
![]()
5. When the mash is thoroughly mixed and at the right temp, I close the lid and put blankets over my cooler to keep in as much heat as possible. I let it sit at least 60 minutes.

6. While my main mash was taking place, I heated up my mash-out and sparge water on the stove. Once again, you could do this in your brew kettle on your turkey fryer.

7. I added the required amount of boiling water to attempt to get the temperature up to 168, a standard mash out temperature. I closed the mash tun and held for 10 minutes.

8. Here is a vorlauf. I run a few quarts of wort into a pitcher. The first wort to come out contains a few grain particles that get through the screen. The grain bed is settling and once it does, the wort begins to run clear. At that point...

9. ...I collect the wort in my brew kettle.

The result of your hard work doing the mash - sweet wort collects in your brew kettle.

10. After you collect your first runnings, it is time to sparge. I simply batch sparge. This means I dump in all the sparge water at once, stir, let sit for another 10 minutes, and collect the 2nd runnings.
To know how much water you will need to add for your sparge, you need to know how much you collected with your first runnings. Let's say you are aiming for 6.5 gallons into the brewpot (assuming a 1 to 1.5 gallon evaporation loss during the boil). If your first runnings yielded 3.5 gallons, you will want to add 3 gallons of sparge water. After a couple batches you will learn how your system works.

11. For the batch sparge, it usually works out that I add 3 to 3.5 gallons of ~180-190 degree water and stir well. I will sometimes let it sit 10 minutes after I get to the temp of 168, and sometimes I won't.

12. Don't forget to vorlauf before collecting the 2nd runnings.

13. Collect the 2nd runnings into your brewpot.

14. Time to get it to your burner. Have fun carrying 6.5 gallons of 168 degree liquid. :) Above I'm bringing the wort to a boil.

15. I did not take pictures of adding hops or other ingredients. You do this as normal. Above you can see I have placed my immersion chiller in the brew kettle. Do this for the last 15 minutes of the boil to sanitize it.

16. I try to get my spent grains onto my compost pile and clean out my mash tun while the wort is boiling. This saves some time at the end. I just make sure all the grain is out and wipe down with hot water and a sponge. I'll run some clean water through the tube as well.

17. When the boil is over it is time to cool down the wort. You will figure out what works best for you. Some guys use garden hoses on their chillers. I like to put some cold water in my laundry tub sink, and then put my brew kettle in it. I also like to collect the hot water coming out of the wort chiller in my washing machine so it can be used for a load of laundry. I typically get my temperature down to 80 after 15 minutes.

18. Because I was brewing a lager I wanted my temperature to be lower than 80. Above you see a new trick I learned. I make some ice ahead of time, and get a bucket of ice water ready. Then I siphon that very cold water through the wort chiller and collect it in another bucket. You can keep recycling it. In another 10 minutes or so, I can get my temperature down to 60. That is a decent temp for pitching lager yeast. This is also a nice trick if you are in warmer climates.
*Your wort will cool much faster if you gently stir it with a sanitized spoon. You want to move the hot wort over the cool copper tubing. If you don't do this, the wort around the tubing will cool, but the wort away from the tubing will not cool as quickly.*
19. When your wort is cool, you can siphon it or, like me, pour it into your fermenter. Here you can see I collected about 4.6 gallons. I could have had a little more in my brew kettle and I would have ended with 5. I added a couple quarts of my yeast starter (seen in background) and topped it off with a little water to just over 5 gallons. No big deal. It will turn out great.

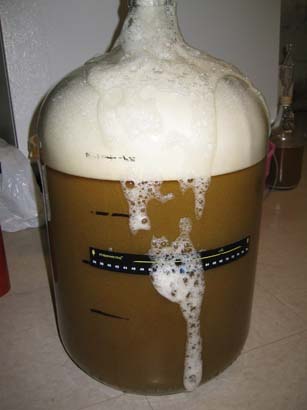
20. I pitched my yeast and voila, a Helles lager is born. In this picture it is a perfect 58 degrees. The next morning it was down to 50 in my cold, corner basement closet.
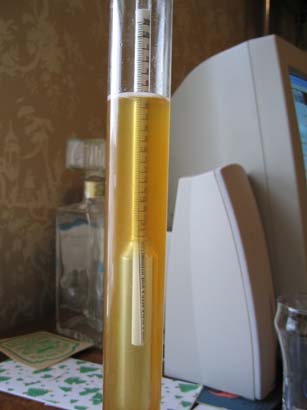
21. You can see the nice light color of this golden lager. Target gravity was 1.052-1.054 and I got 1.051 which is just fine.
Time to clean up! :)
It's work but it's fun. And I keep doing it for a couple reasons. The first is, frankly, I think the beer tastes better. There is a common taste among extract beers (sometimes referred to, a little misleadingly in my opinion, as a "twang") that is absent in all-grain. The thing is, you don't often notice it in extract beer. But you notice its absence in your all-grain beer.
The second and more important reason is the satisfaction. To go from a bag of crushed grain, a few ounces of hops, and a packet of yeast to enjoying a deeelicious, hand-crafted homebrew, to being part of the thousands of years of beer history and doing it the same way as early brewers, it all brings a healthy and well-deserved feeling of pride.
Cheers everybody. Happy brewing.

© 2010 Don Osborn